
Building a production ML pipeline in GCP: a fully worked-out example
Building a production ML pipeline in GCP: a fully worked-out example
After only having used AWS, I decided to take the time to learn GCP. For this, I’ll be using the classic Titanic dataset from Kaggle.
1. Setting Up GCP
Setup is INFINITELY EASIER with AI agents
I really hate the setup process for any cloud environment, and it used to take up an afternoon of my time going through the relevant walkthroughs. But now it seems like coding agents can one-shot them. Nice!
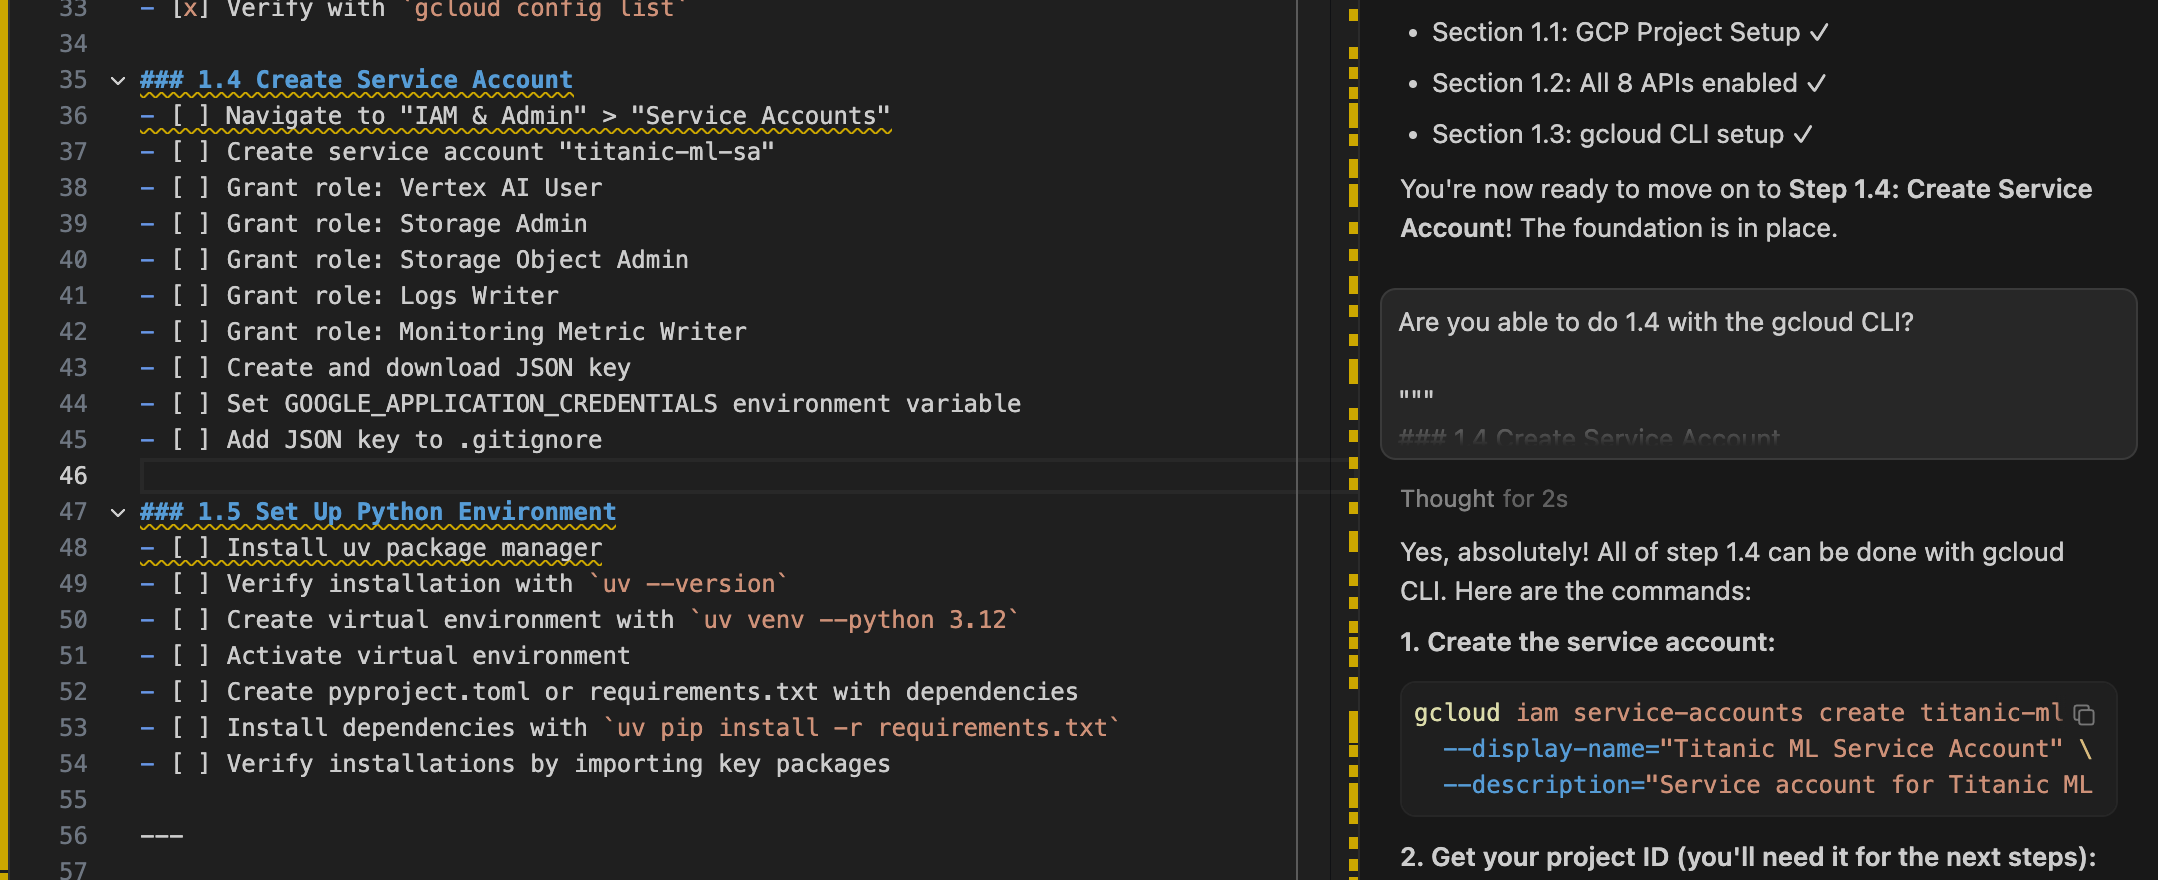

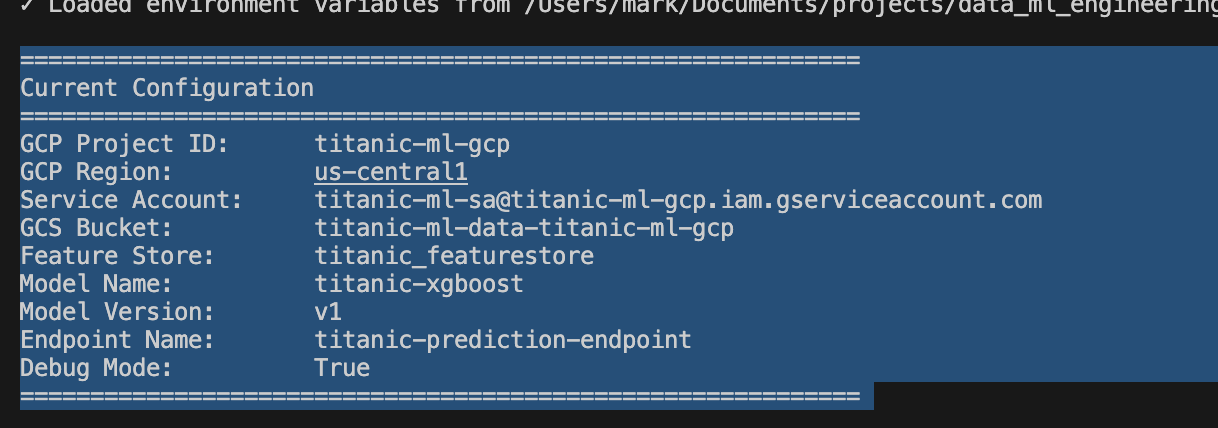
Setup looks great and it was one-shot, nice!
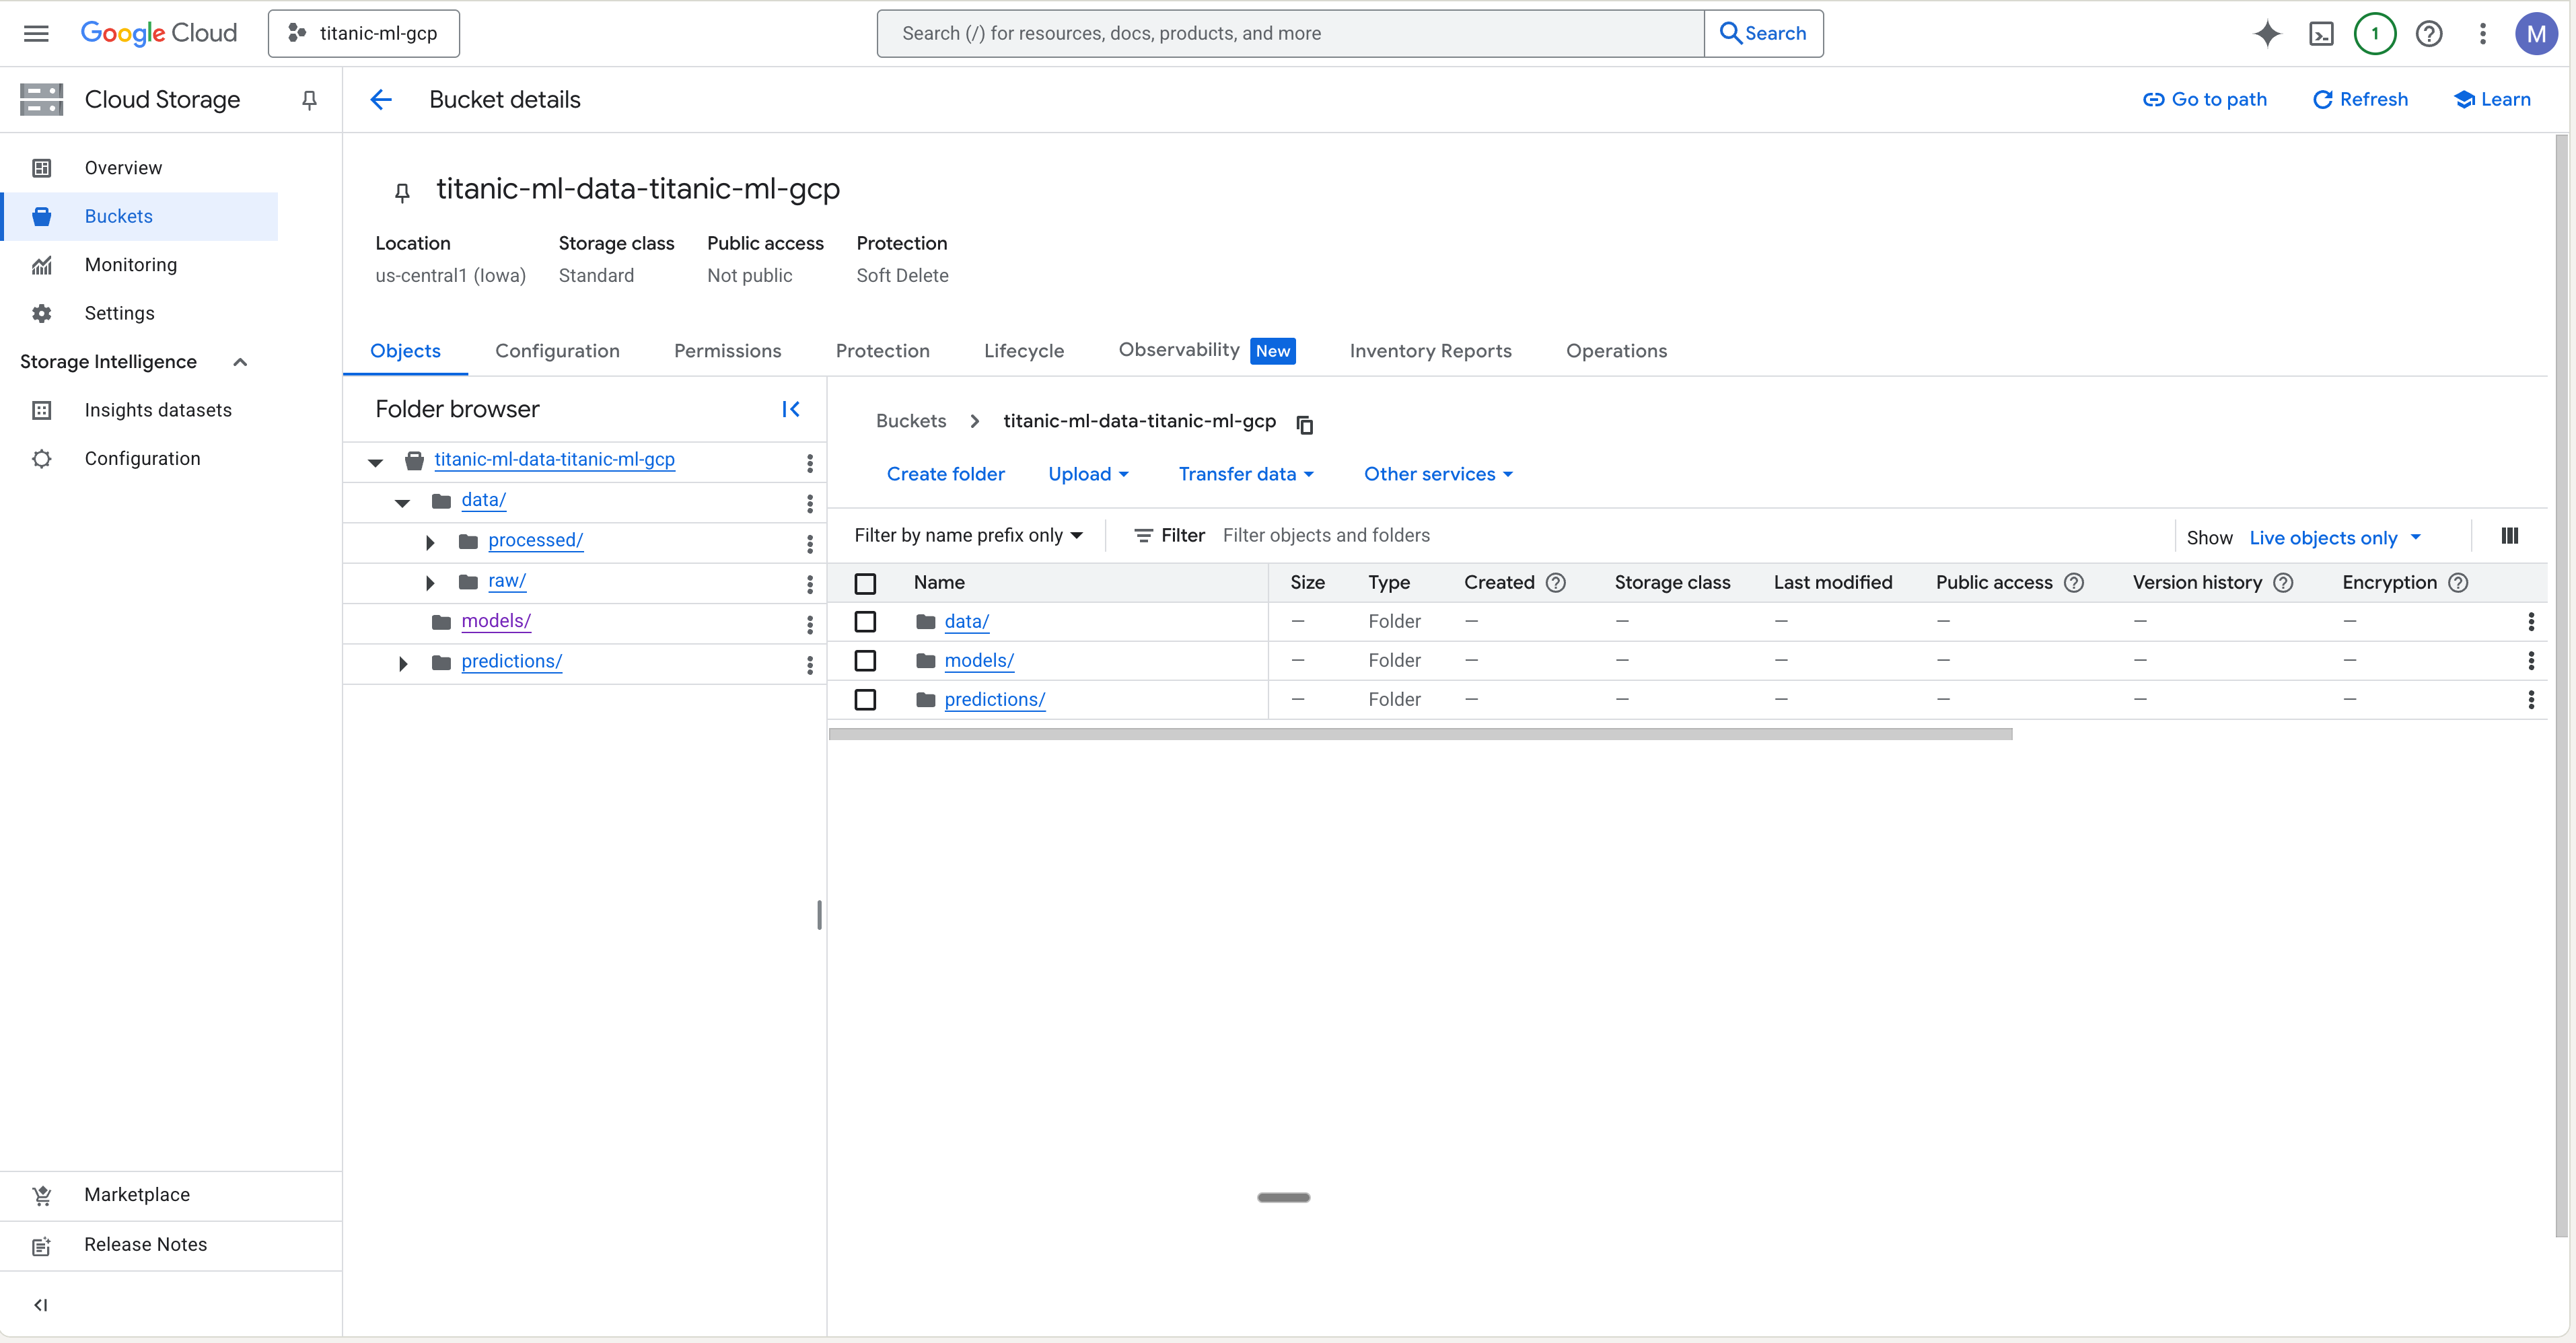
Object storage in GCP has a better UI than in AWS S3
I find the UI in the object storage much easier to navigate than in S3, especially as I try to navigate “folders” (yes, everything is an object so ‘folders’ aren’t real).
2. Getting the data and setting up the feature store
2.1 Getting the data and uploading to GCS
Our dataset is the Titanic dataset from Kaggle.
We can build on top of the datasets package from HuggingFace to build our own DataLoader.
class TitanicDataLoader:
    """
    A reusable data loader for the Titanic dataset.

    This class handles:
    - Loading data from HuggingFace datasets
    - Converting to pandas DataFrames
    - Caching data locally
    - Providing dataset metadata and statistics

    Examples:
        >>> loader = TitanicDataLoader()
        >>> train_df, test_df = loader.load_data()
        >>> print(loader.get_dataset_info())
    """
We can then create a script that will get our raw data and upload to Google Cloud Storage (GCS).
"""
Script to load Titanic dataset and save to local and GCS storage.

This script:
1. Loads the Titanic dataset from HuggingFace
2. Saves raw data to local data/raw directory
3. Uploads data to Google Cloud Storage
4. Displays dataset information

Usage:
    python scripts/01_load_and_save_data.py
"""
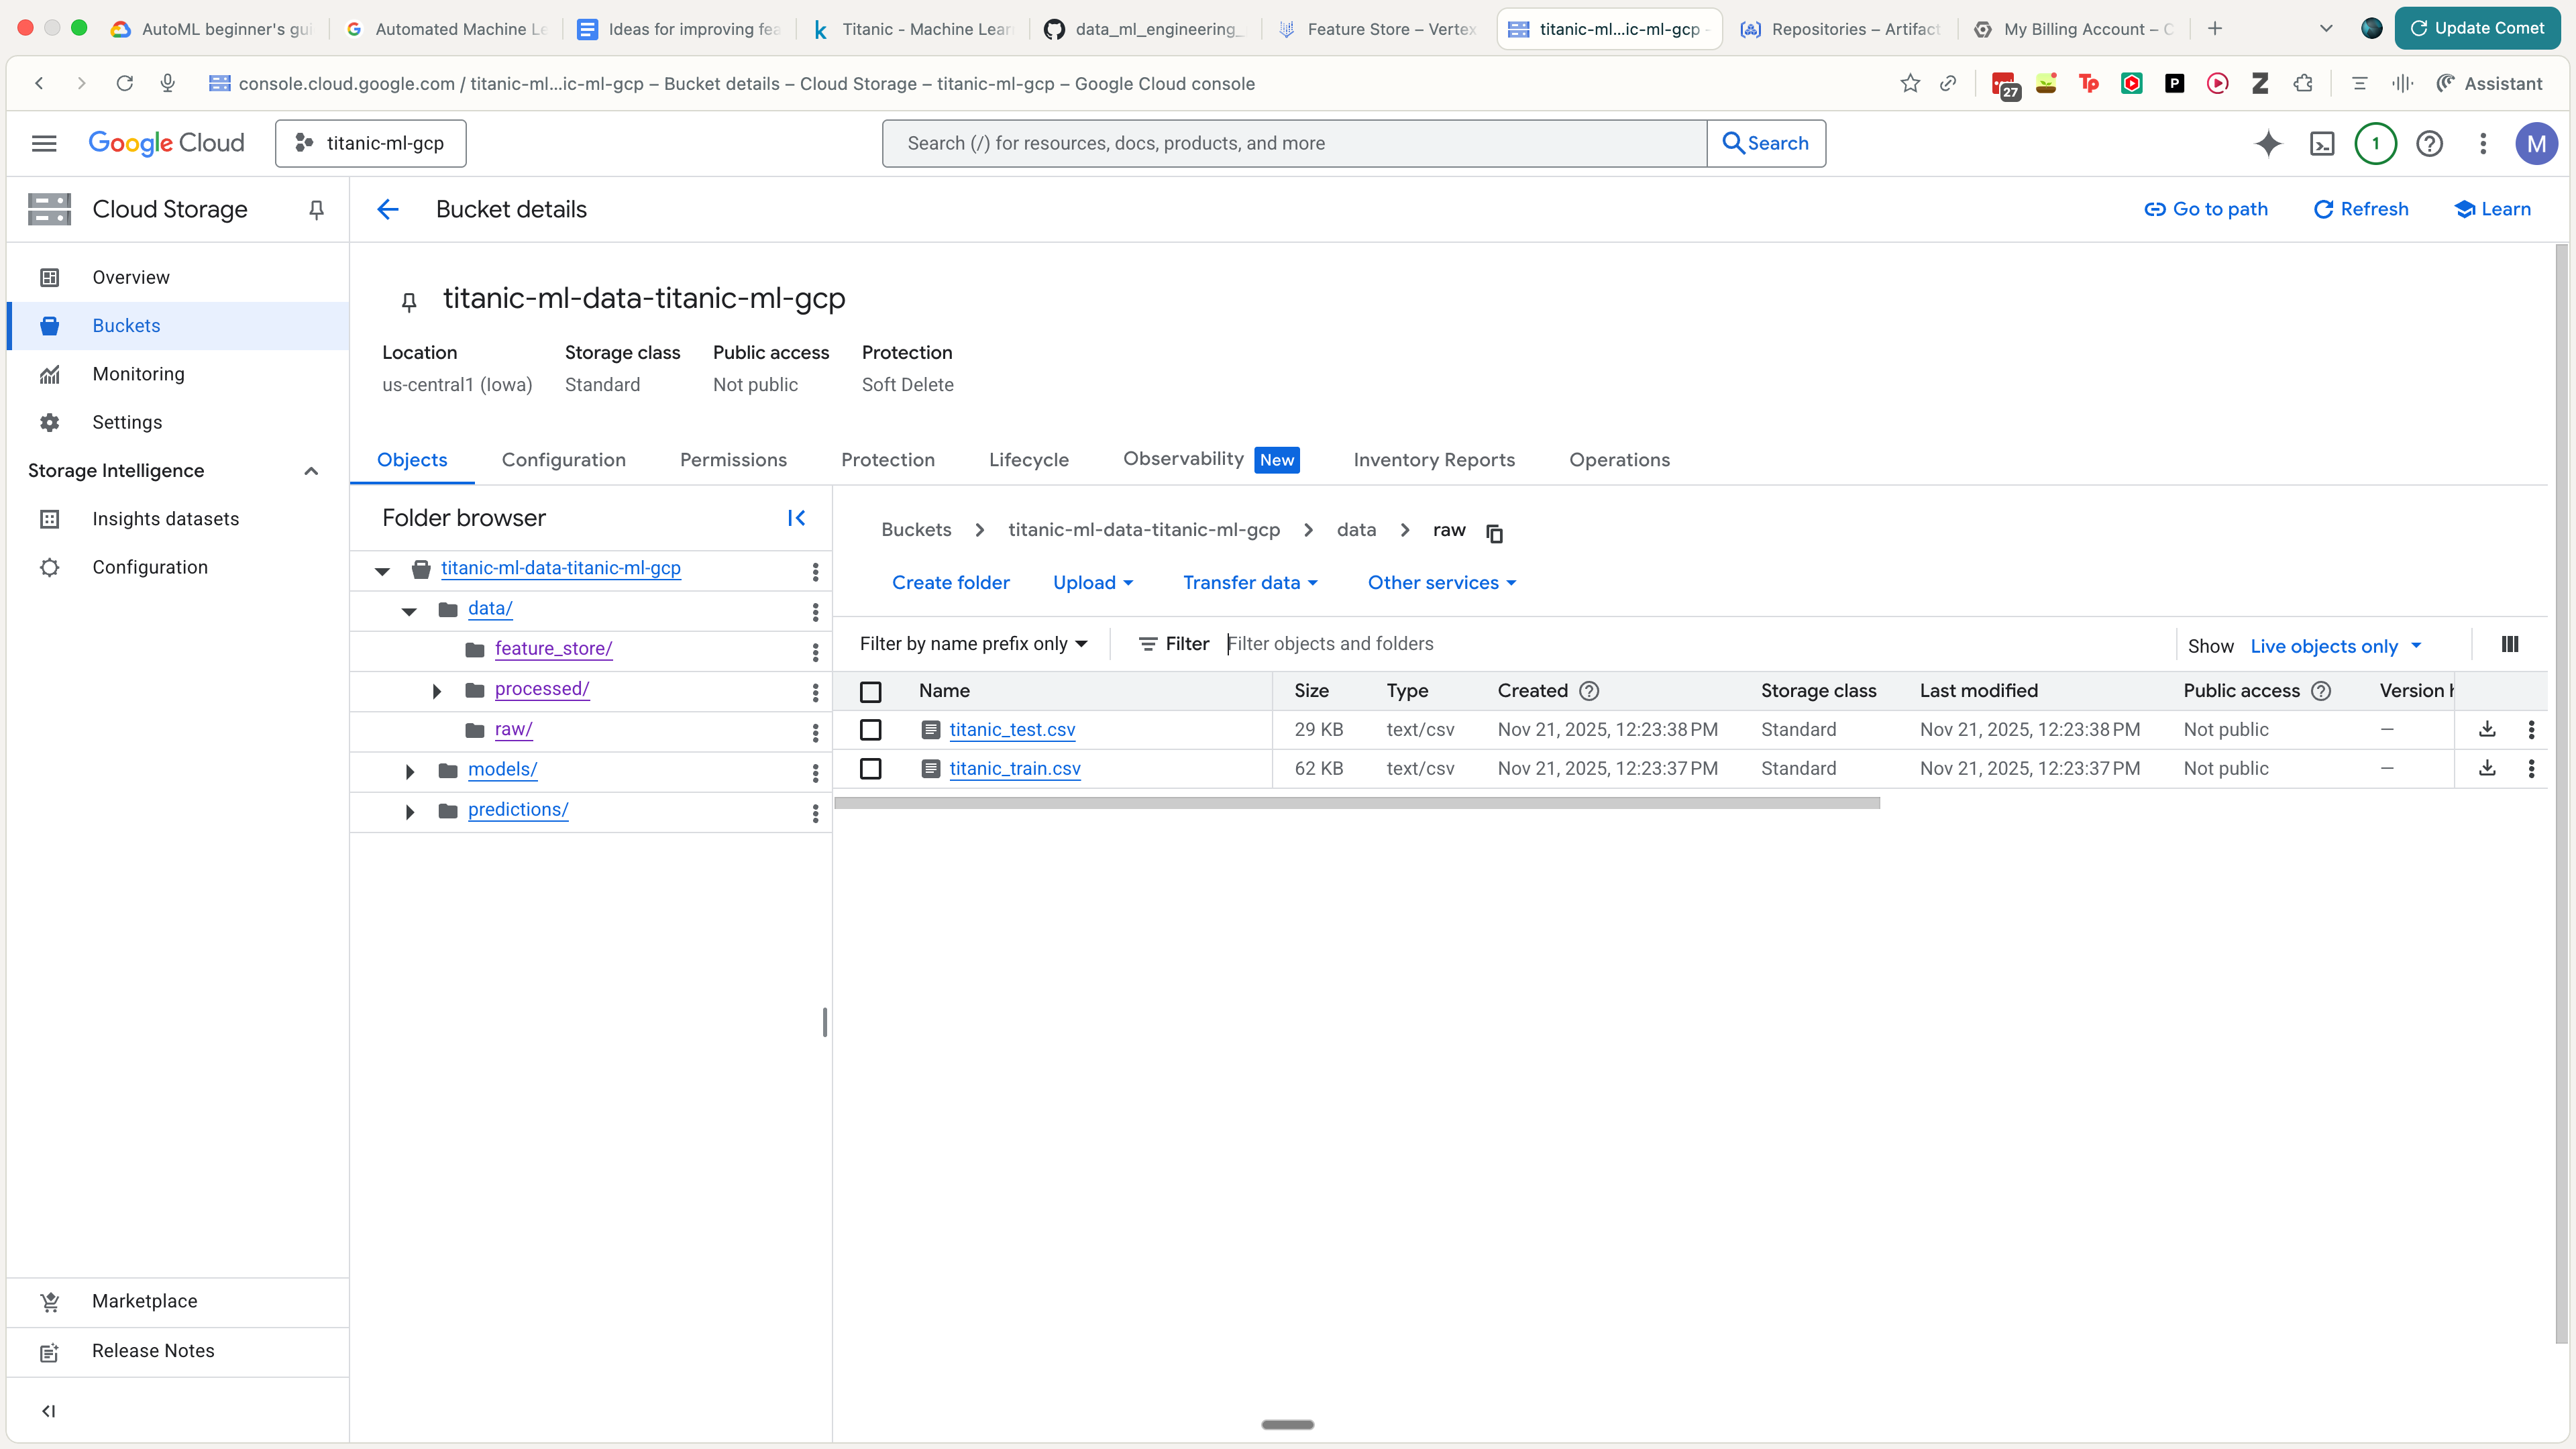
The output looks something like this.
2.2 Basic EDA
We can do some basic EDA in a Jupyter notebook. This’ll give us a basic idea of things like feature distribution.

2.3 Insert data into feature store
Now that we’ve doen some EDA, we can start creating features. This requires:
- Setting up the feature store in GCP.
- Inserting into the feature store.
We can do something like this to insert into the feature store (assuming that you already did gcloud to create the feature store).
def main():
    logger.info("Starting Feature Store data preparation...")

    # 1. Load Raw Data (to get PassengerId)
    loader = TitanicDataLoader()
    train_df, _ = loader.load_data()

    # 2. Preprocess Features
    # Load the saved preprocessor to ensure consistency
    preprocessor_path = os.path.join("data", "artifacts", "preprocessor.joblib")
    if os.path.exists(preprocessor_path):
        preprocessor = TitanicPreprocessor.load(preprocessor_path)
        logger.info("Loaded existing preprocessor.")
    else:
        logger.info("Fitting new preprocessor...")
        preprocessor = TitanicPreprocessor()
        preprocessor.fit(train_df)

    X_train = preprocessor.transform_with_scaling(train_df)

    # 3. Construct Feature Store DataFrame
    # We need: entity_id (PassengerId), feature_timestamp, and features

    fs_df = X_train.copy()

    # Add Entity ID
    fs_df['passenger_id'] = train_df['PassengerId'].astype(str)

    # Add Timestamp (using current time for this batch)
    # In a real scenario, this might be the time the data was recorded
    current_time = datetime.now().isoformat()
    fs_df['feature_timestamp'] = current_time

    # Add Target (Optional, but useful for training data generation from FS)
    fs_df['Survived'] = train_df['Survived']

    # Lowercase all columns to match Feature Store requirements
    fs_df.columns = fs_df.columns.str.lower()

    logger.info(f"Feature Store DataFrame shape: {fs_df.shape}")
    logger.info(f"Columns: {fs_df.columns.tolist()}")

    # 4. Save locally
    local_fs_dir = os.path.join("data", "feature_store")
    os.makedirs(local_fs_dir, exist_ok=True)
    local_path = os.path.join(local_fs_dir, "titanic_features.csv")

    fs_df.to_csv(local_path, index=False)
    logger.info(f"Saved feature store data to {local_path}")

    # 5. Upload to GCS
    try:
        gcs = GCSManager()
        gcs_path = "data/feature_store/titanic_features.csv"
        gcs.upload_file(local_path, gcs_path)
        logger.info(f"Uploaded to gs://{config.GCS_BUCKET_NAME}/{gcs_path}")
    except Exception as e:
        logger.error(f"Failed to upload to GCS: {e}")
3. Training and Deploying an XGBoost model on Vertex AI
Now that the data is added to GCS and to the Feature Store, we can start training our model.
3.1 Writing up the code
We start setting up our XGBoost model.
@dataclass
class XGBoostParams:
    """XGBoost model hyperparameters."""

    # Core XGBoost parameters
    objective: str = "binary:logistic"
    max_depth: int = 5
    learning_rate: float = 0.1
    n_estimators: int = 100

    # Regularization
    min_child_weight: int = 1
    gamma: float = 0.0
    subsample: float = 0.8
    colsample_bytree: float = 0.8
    reg_alpha: float = 0.0
    reg_lambda: float = 1.0

    # Training behavior
    random_state: int = 42
    n_jobs: int = -1
    tree_method: str = "hist"

    # Early stopping
    early_stopping_rounds: int = 10
    eval_metric: str = "auc"
We set up a ModelArtifactManager to manage all I/O related to the model artifacts.
class ModelArtifactManager:
    """Manages model artifacts including saving, loading, and GCS operations."""

    def __init__(self, bucket_name: Optional[str] = None):
        """
        Initialize model artifact manager.

        Args:
            bucket_name: GCS bucket name. If None, uses config.GCS_BUCKET_NAME
        """
        self.bucket_name = bucket_name or config.GCS_BUCKET_NAME

        # Attempt to initialize GCS client; fall back gracefully if ADC is missing
        try:
            self.storage_client = storage.Client(project=config.GCP_PROJECT_ID)
            self.bucket = self.storage_client.bucket(self.bucket_name)
        except DefaultCredentialsError as e:
            logger.warning(
                "Could not initialize GCS client due to missing credentials: %s. "
                "ModelArtifactManager will operate in local-only mode.",
                e,
            )
            self.storage_client = None
            self.bucket = None
        except Exception as e:
            logger.warning(
                "Unexpected error initializing GCS client: %s. "
                "ModelArtifactManager will operate in local-only mode.",
                e,
            )
            self.storage_client = None
            self.bucket = None
We then set up our Trainer class.
class XGBoostTrainer:
    """
    Trainer class for XGBoost models.

    Handles the complete training workflow including data loading,
    preprocessing, model training, and artifact saving.
    """

    def __init__(
        self,
        model_params: Optional[XGBoostParams] = None,
        training_config: Optional[TrainingConfig] = None,
        job_name: Optional[str] = None
    ):
        """
        Initialize XGBoost trainer.

        Args:
            model_params: XGBoost hyperparameters
            training_config: Training configuration
            job_name: Name for the training job (for logging)
        """
        self.model_params = model_params or XGBoostParams()
        self.training_config = training_config or TrainingConfig()
        self.job_name = job_name or f"xgboost_training_{datetime.now().strftime('%Y%m%d_%H%M%S')}"

        # Initialize model and artifact manager
        self.model: Optional[XGBClassifier] = None
        self.artifact_manager = ModelArtifactManager()

        # Training data
        self.X_train: Optional[pd.DataFrame] = None
        self.X_val: Optional[pd.DataFrame] = None
        self.y_train: Optional[pd.Series] = None
        self.y_val: Optional[pd.Series] = None
        self.feature_names: Optional[list] = None

        # Training metrics
        self.training_metrics: Dict[str, Any] = {}
We also add evaluations for our model trainer, such as AUC.
class ModelEvaluator:
    """
    Comprehensive model evaluator for classification tasks.

    Handles model evaluation, metrics calculation, and visualization.
    """

    def __init__(
        self,
        model: Optional[XGBClassifier] = None,
        eval_config: Optional[EvaluationConfig] = None
    ):
        """
        Initialize model evaluator.

        Args:
            model: Trained model to evaluate
            eval_config: Evaluation configuration
        """
        self.model = model
        self.eval_config = eval_config or EvaluationConfig()
        self.artifact_manager = ModelArtifactManager()

        # Evaluation results
        self.metrics: Dict[str, float] = {}
        self.predictions: Optional[np.ndarray] = None
        self.prediction_probas: Optional[np.ndarray] = None

        logger.info("Initialized ModelEvaluator")
We also create a Dockerfile for our model training service.
# Dockerfile for XGBoost Training on Vertex AI
# This container is optimized for training XGBoost models on Vertex AI Custom Training

# Use Python 3.12 slim image as base
# Alternative: gcr.io/deeplearning-platform-release/base-cpu for pre-built GCP image
FROM python:3.12-slim

# Set working directory
WORKDIR /app

# Set environment variables
ENV PYTHONUNBUFFERED=1 \
    PYTHONDONTWRITEBYTECODE=1 \
    PIP_NO_CACHE_DIR=1 \
    PIP_DISABLE_PIP_VERSION_CHECK=1

# Weights & Biases configuration (can be overridden at runtime)
ENV USE_WANDB=${USE_WANDB:-true} \
    WANDB_PROJECT=${WANDB_PROJECT:-titanic-ml-gcp} \
    WANDB_API_KEY=${WANDB_API_KEY:-} \
    WANDB_DIR=/app/outputs/wandb \
    WANDB_CACHE_DIR=/app/outputs/wandb_cache

# Install system dependencies
RUN apt-get update && apt-get install -y \
    gcc \
    g++ \
    make \
    curl \
    git \
    && rm -rf /var/lib/apt/lists/*

# Install uv for fast package installation
RUN curl -LsSf https://astral.sh/uv/install.sh | sh
ENV PATH="/root/.local/bin:${PATH}"

# Copy dependency files
COPY requirements.txt /app/
COPY pyproject.toml /app/

# Install Python dependencies using uv
RUN /root/.local/bin/uv pip install --system -r requirements.txt

# Copy source code
COPY src/ /app/src/
COPY deployment/ /app/deployment/

# Set Python path
ENV PYTHONPATH=/app:${PYTHONPATH}

# Create output directories
RUN mkdir -p /app/outputs/models /app/outputs/evaluation /app/outputs/wandb /app/outputs/wandb_cache

# Set up entrypoint
ENTRYPOINT ["python", "-m", "src.models.trainer"]

# Default command (can be overridden)
CMD ["--help"]
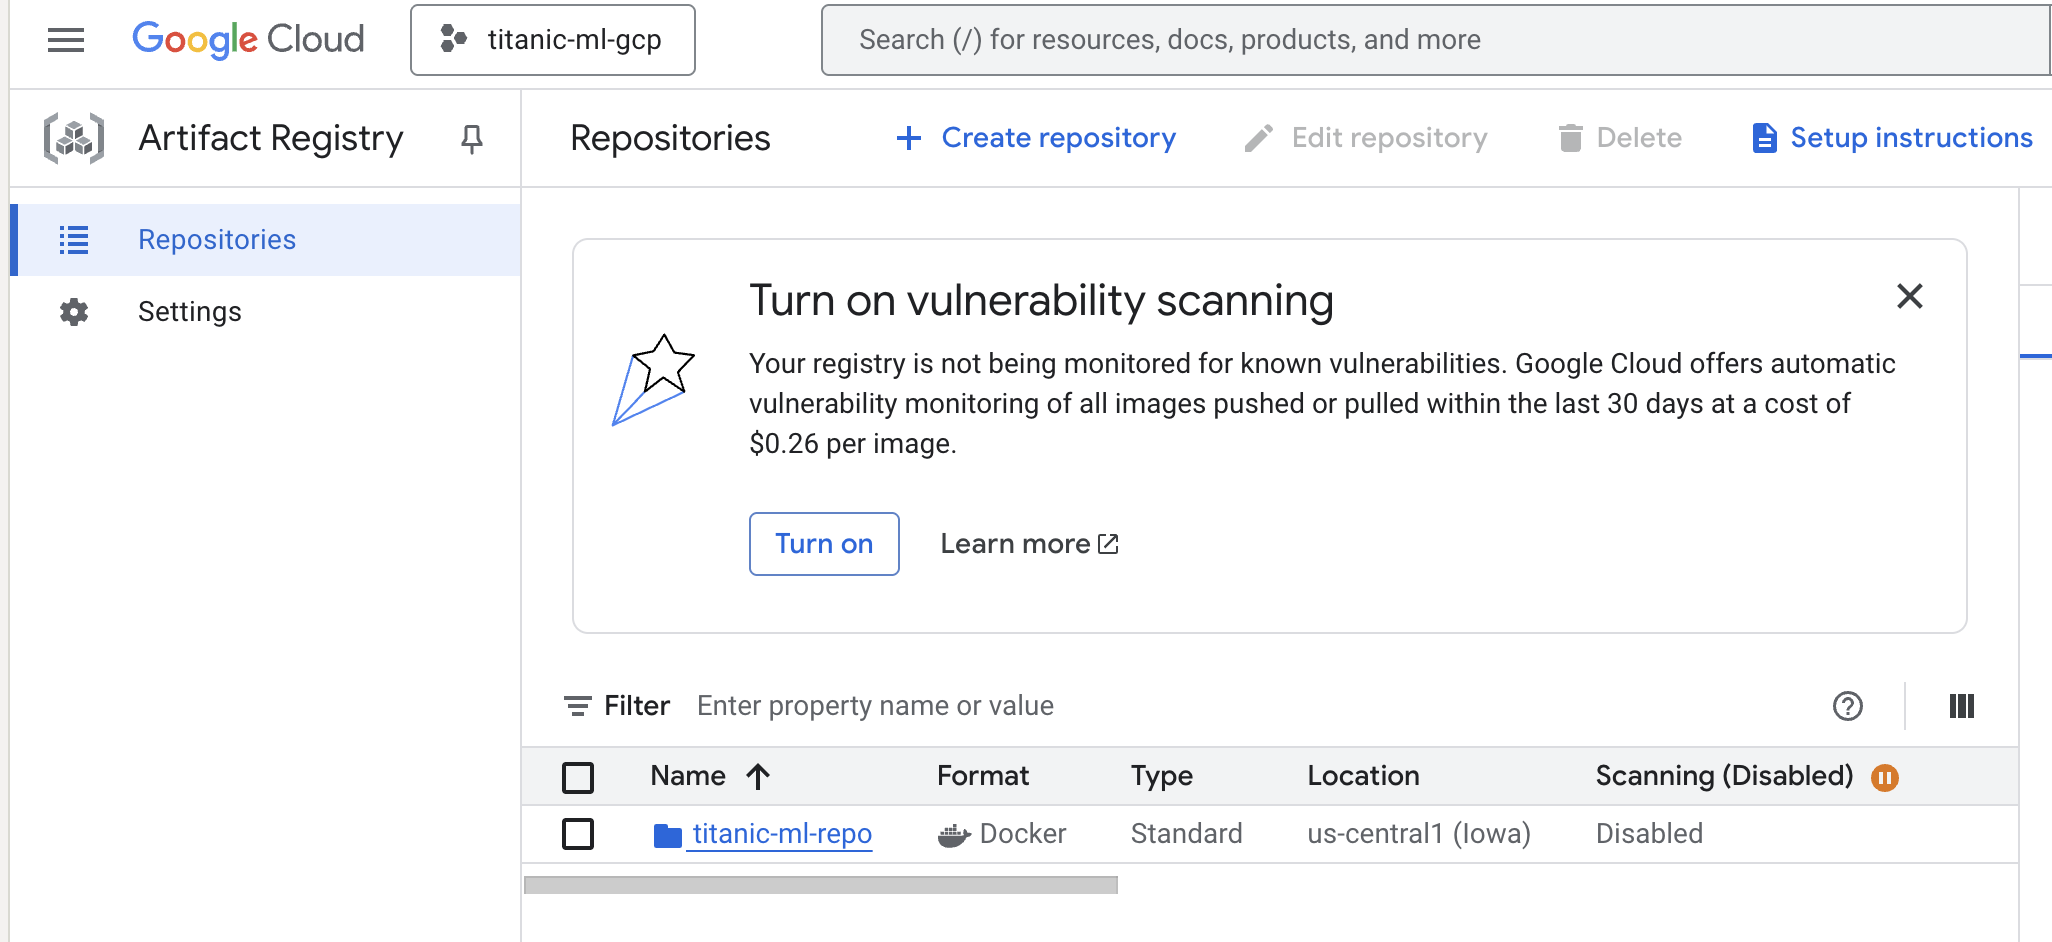
We run this and we can see the updated Docker image in GCP’s Artifact Registry.
3.2 Adding Weights and Biases for some telemetry
We add Weights and Biases to include telemetry for the model trainer.
class XGBoostTrainer:
    """
    Trainer class for XGBoost models.

    Handles the complete training workflow including data loading,
    preprocessing, model training, and artifact saving.
    """

    def __init__(
        self,
        model_params: Optional[XGBoostParams] = None,
        training_config: Optional[TrainingConfig] = None,
        job_name: Optional[str] = None
    ):
        """
        Initialize XGBoost trainer.

        Args:
            model_params: XGBoost hyperparameters
            training_config: Training configuration
            job_name: Name for the training job (for logging)
        """
        ...
        # W&B run tracking
        self.wandb_run = None
        self.use_wandb = config.USE_WANDB and WANDB_AVAILABLE

        if self.use_wandb and not WANDB_AVAILABLE:
            logger.warning("W&B is enabled in config but wandb package is not installed. Disabling W&B.")
            self.use_wandb = False

        logger.info(f"Initialized XGBoostTrainer for job: {self.job_name}")
        if self.use_wandb:
            logger.info("W&B tracking enabled")

    def _init_wandb_run(self) -> None:
        """Initialize Weights & Biases run for experiment tracking."""
        if not self.use_wandb:
            return

        try:
            # Explicit login if API key is provided (useful inside containers)
            if config.WANDB_API_KEY:
                try:
                    wandb.login(key=config.WANDB_API_KEY)
                    logger.info("Authenticated with W&B using provided API key")
                except Exception as login_err:
                    logger.error(f"Failed to authenticate with W&B: {login_err}")

            # Initialize W&B run
            self.wandb_run = wandb.init(
                project=config.WANDB_PROJECT,
                entity=config.WANDB_ENTITY if config.WANDB_ENTITY else None,
                name=self.job_name,
                config={
                    "model_type": "XGBoost",
                    "model_params": self.model_params.to_dict(),
                    "training_config": self.training_config.to_dict(),
                    "gcp_project": config.GCP_PROJECT_ID,
                    "gcp_region": config.GCP_REGION,
                },
                tags=["xgboost", "titanic", "training", "vertex-ai"],
                reinit=True  # Allow multiple runs in same process
            )
            logger.info(f"W&B run initialized: {self.wandb_run.name} (ID: {self.wandb_run.id})")
        except Exception as e:
            logger.error(f"Failed to initialize W&B run: {e}")
            self.use_wandb = False

    def _finish_wandb_run(self) -> None:
        """Finish Weights & Biases run."""
        if self.wandb_run is not None:
            try:
                wandb.finish()
                logger.info("W&B run finished")
            except Exception as e:
                logger.error(f"Error finishing W&B run: {e}")
            finally:
                self.wandb_run = None
3.3 Doing a local training run
We then, after this setup, do a local training run. We can create a single script to do this.
def train_local(
    train_path: str,
    test_path: str = None,
    output_dir: str = "outputs/models/local",
    version: str = None,
    upload_to_gcs: bool = False,
    run_evaluation: bool = True,
    **kwargs
) -> dict:
    """
    Train model locally.

    Args:
        train_path: Path or GCS URI to training data
        test_path: Path or GCS URI to test data
        output_dir: Local output directory
        version: Model version
        upload_to_gcs: Whether to upload artifacts to GCS
        run_evaluation: Whether to run evaluation after training
        **kwargs: Additional training parameters

    Returns:
        Dictionary with training and evaluation results
    """
    logger.info("="*60)
    logger.info("Starting Local Training")
    logger.info("="*60)
    logger.info(f"Training Data: {train_path}")
    logger.info(f"Test Data: {test_path}")
    logger.info(f"Output Directory: {output_dir}")
    logger.info(f"Upload to GCS: {upload_to_gcs}")
    logger.info("="*60)

    # Create custom training config if parameters provided
    training_config = TrainingConfig()
    if kwargs:
        for key, value in kwargs.items():
            if hasattr(training_config, key):
                setattr(training_config, key, value)

    # Initialize trainer
    trainer = XGBoostTrainer(
        model_params=XGBoostParams(),
        training_config=training_config
    )

    # Run training pipeline
    logger.info("\n📊 Starting training pipeline...")
    training_results = trainer.run_training_pipeline(
        train_path=train_path,
        test_path=test_path,
        output_dir=Path(output_dir),
        version=version,
        upload_to_gcs=upload_to_gcs
    )

    logger.info("\n✓ Training completed successfully")

    # Print training results
    print("\n" + "="*60)
    print("Training Results")
    print("="*60)
    print(f"Job Name: {training_results['job_name']}")
    print(f"\nTraining Metrics:")
    for metric, value in training_results['training_metrics'].items():
        print(f"  {metric}: {value}")

    if training_results.get('cv_results'):
        cv_mean = training_results['cv_results']['cv_mean']
        cv_std = training_results['cv_results']['cv_std']
        print(f"\nCross-Validation Score: {cv_mean:.4f} (+/- {cv_std:.4f})")

    print("="*60)

    # Run evaluation if test data provided
    evaluation_results = None
    if run_evaluation and test_path:
        logger.info("\n📈 Starting model evaluation...")

        # Load test data
        from src.utils.gcs_utils import load_dataframe_from_gcs
        test_df = load_dataframe_from_gcs(test_path)

        # Prepare test features
        y_test = test_df['Survived']
        X_test = test_df.drop(columns=['Survived'])

        # Ensure feature consistency
        X_test = X_test[training_results['feature_names']]

        # Create evaluator
        evaluator = ModelEvaluator(model=trainer.model)

        # Run evaluation
        eval_output_dir = Path(output_dir).parent / "evaluation" / (version or "latest")
        evaluation_results = evaluator.evaluate(
            X_test, y_test,
            feature_names=training_results['feature_names'],
            output_dir=eval_output_dir
        )

        logger.info("\n✓ Evaluation completed successfully")

        # Print evaluation results
        print("\n" + "="*60)
        print("Evaluation Results")
        print("="*60)
        print(f"Test Samples: {evaluation_results['n_samples']}")
        print(f"Correct Predictions: {evaluation_results['n_correct']}")
        print(f"\nTest Metrics:")
        for metric, value in evaluation_results['metrics'].items():
            print(f"  {metric}: {value:.4f}")
        print("="*60)

    return {
        "training": training_results,
        "evaluation": evaluation_results
    }
We run the training job in a local Docker container and we can check the results in Weights & Biases.
    docker run --rm \
      --env-file .env \
      -e USE_WANDB=true \
      -e WANDB_PROJECT=titanic-ml-gcp \
      -e WANDB_ENTITY=mind_technology_lab \
      -v $HOME/.config/gcloud:/root/.config/gcloud:ro \
      titanic-xgboost-training:local \
      --train-path gs://titanic-ml-data-titanic-ml-gcp/data/processed/train_processed.csv \
      --test-path  gs://titanic-ml-data-titanic-ml-gcp/data/processed/test_processed.csv \
      --output-dir /app/outputs/models \
      --version v1
    ```

  - Training completed, artifacts saved locally and uploaded to GCS as before.
  - W&B printed the final run link:

    ```text
    🚀 View run xgboost_training_20251122_011139 at:
    https://wandb.ai/mind_technology_lab/titanic-ml-gcp/runs/t4yvazex
    ```

**What you should see now**

- In W&B under **workspace** `mind_technology_lab`, **project** `titanic-ml-gcp` → **Runs** tab, you should see at least:
  - `titanic-ml-gcp-wandb-test-minimal` (the small test).
  - `xgboost_training_20251122_011139` (the full Docker training run, URL shown above) with:
    - CV metrics, train/val metrics, and XGBoost training curves from the training phase.
Here are the results from wandb.
final_train_accuracy:0.8679775280898876
final_train_auc:0.9270903735596218
final_val_accuracy:0.8212290502793296
final_val_auc:0.8571805006587615
train/best_iteration:11
train/duration_seconds:2.086491
train/final_accuracy:0.8679775280898876
train/final_auc:0.9270903735596218
train/n_estimators:100
training_time:2.086491
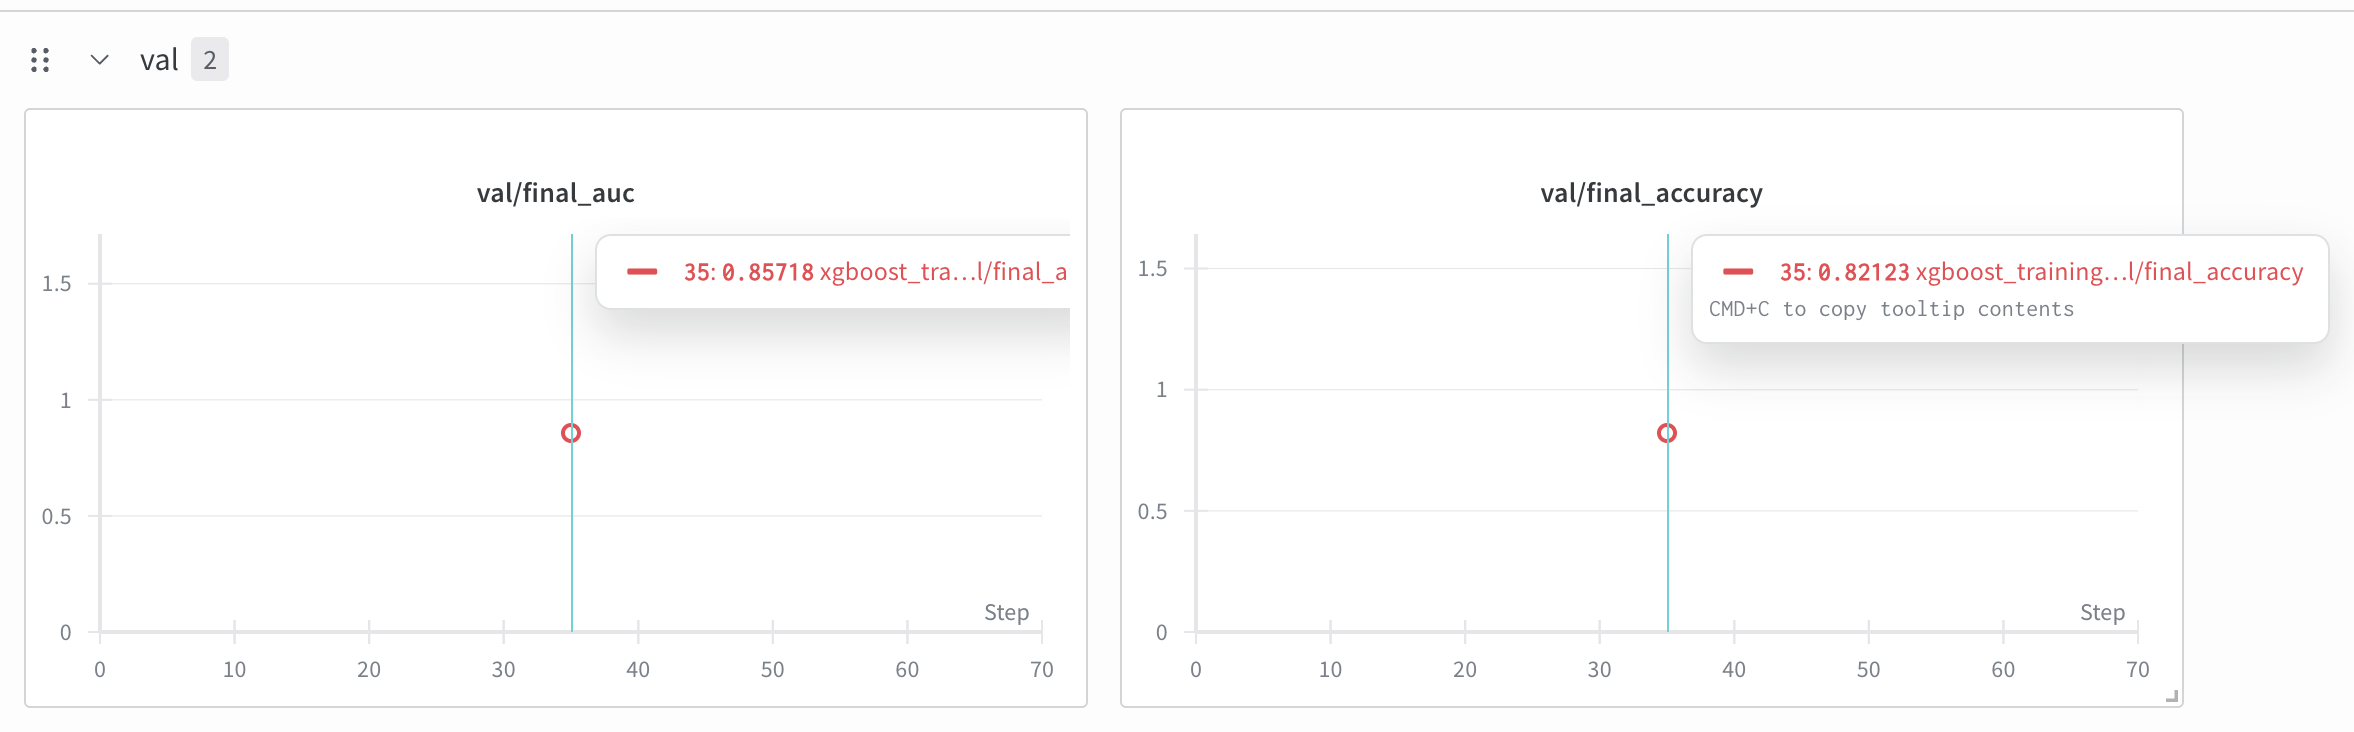
val/final_accuracy:0.8212290502793296
val/final_auc:0.8571805006587615
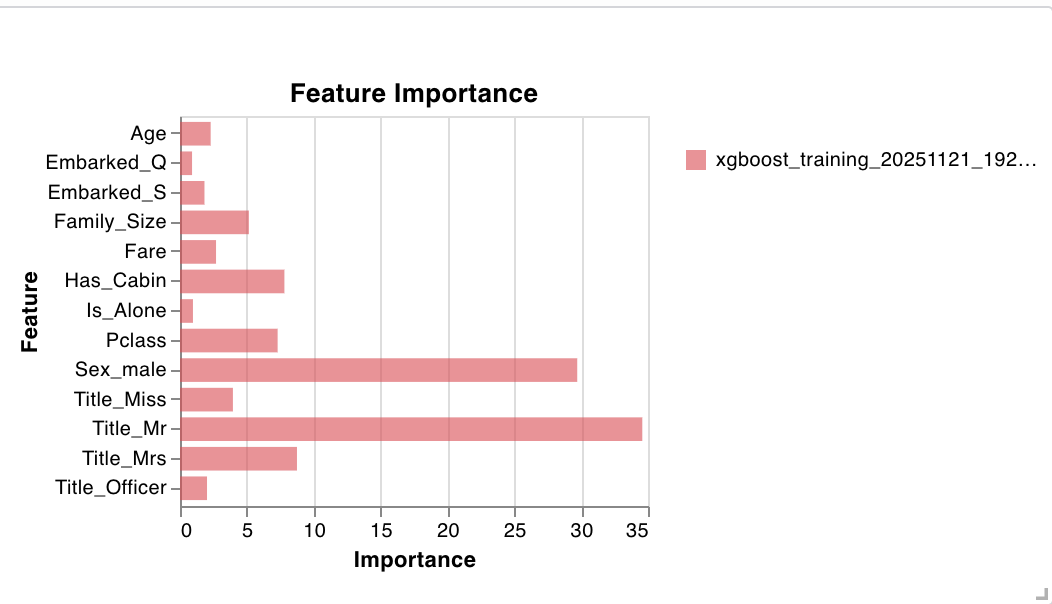
We can take a look at some visualizations, such as feature importance.
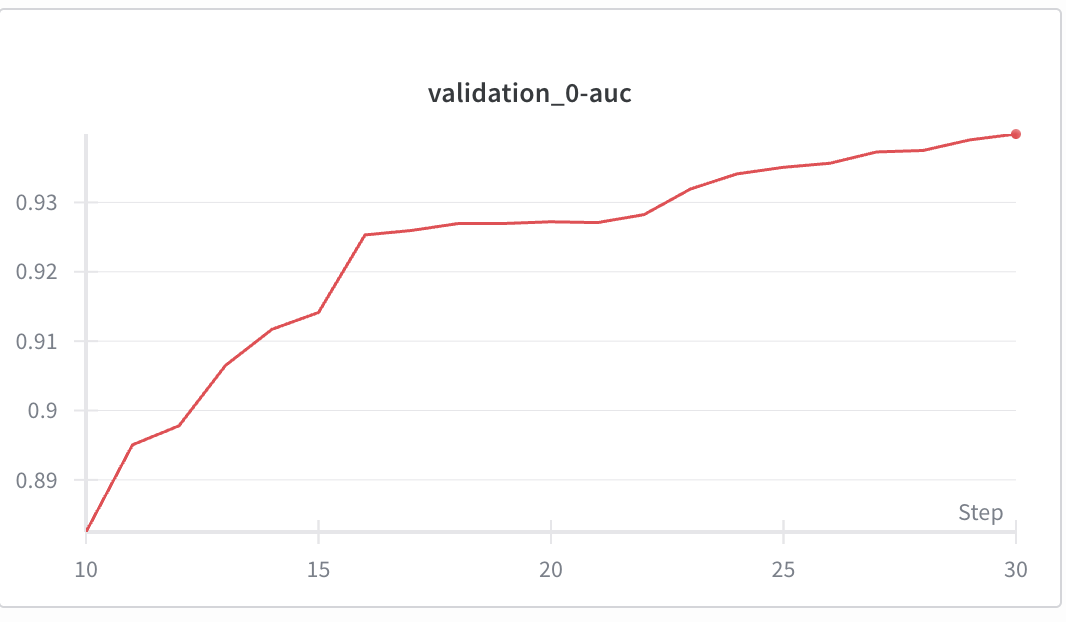
We can also look at metrics like AUC.
3.4 Doing a training run on Vertex AI
Now that we’ve gotten it to work locally, let’s set up a run on Vertex AI.
def submit_training_job(
    job_name: Optional[str] = None,
    container_image_uri: Optional[str] = None,
    train_data_path: Optional[str] = None,
    test_data_path: Optional[str] = None,
    output_dir: Optional[str] = None,
    model_version: Optional[str] = None,
    machine_type: str = "n1-standard-4",
    replica_count: int = 1,
    use_gpu: bool = False,
    service_account: Optional[str] = None,
    wait_for_completion: bool = True
) -> aiplatform.CustomContainerTrainingJob:
    """
    Submit training job to Vertex AI.

    Args:
        job_name: Name for the training job
        container_image_uri: URI of training container
        train_data_path: GCS path to training data
        test_data_path: GCS path to test data
        output_dir: GCS output directory
        model_version: Version string for model
        machine_type: Machine type for training
        replica_count: Number of replicas
        use_gpu: Whether to use GPU acceleration
        service_account: Service account email
        wait_for_completion: Whether to wait for job completion

    Returns:
        Training job instance
    """
    # Set defaults
    if job_name is None:
        timestamp = datetime.now().strftime("%Y%m%d_%H%M%S")
        job_name = f"xgboost_training_{timestamp}"

    if container_image_uri is None:
        # Use default image URI format
        container_image_uri = (
            f"{config.GCP_REGION}-docker.pkg.dev/"
            f"{config.GCP_PROJECT_ID}/titanic-ml-repo/"
            f"xgboost-training:latest"
        )

    if train_data_path is None:
        train_data_path = f"{config.GCS_DATA_URI}/processed/train.csv"

    if output_dir is None:
        output_dir = f"{config.GCS_MODEL_URI}/{model_version or 'latest'}"

    if service_account is None:
        service_account = config.SERVICE_ACCOUNT_EMAIL

    # Configure GPU if requested
    accelerator_type = None
    accelerator_count = 0
    if use_gpu:
        accelerator_type = "NVIDIA_TESLA_T4"
        accelerator_count = 1
        logger.info("GPU acceleration enabled")

    # Prepare container arguments
    container_args = [
        "--train-path", train_data_path,
        "--output-dir", output_dir,
    ]

    if test_data_path:
        container_args.extend(["--test-path", test_data_path])

    if model_version:
        container_args.extend(["--version", model_version])

    logger.info("Submitting training job to Vertex AI")
    logger.info(f"Job Name: {job_name}")
    logger.info(f"Container URI: {container_image_uri}")
    logger.info(f"Train Data: {train_data_path}")
    logger.info(f"Output Directory: {output_dir}")
    logger.info(f"Machine Type: {machine_type}")
    logger.info(f"Service Account: {service_account}")

    # Initialize Vertex AI
    aiplatform.init(
        project=config.GCP_PROJECT_ID,
        location=config.GCP_REGION,
        staging_bucket=config.GCS_BUCKET_URI
    )

    # Create custom container training job
    job = aiplatform.CustomContainerTrainingJob(
        display_name=job_name,
        container_uri=container_image_uri,
    )

    # Run the training job
    logger.info("Starting training job execution...")

    job.run(
        args=container_args,
        replica_count=replica_count,
        machine_type=machine_type,
        accelerator_type=accelerator_type,
        accelerator_count=accelerator_count,
        base_output_dir=output_dir,
        service_account=service_account,
        sync=wait_for_completion
    )

    if wait_for_completion:
        logger.info("✓ Training job completed successfully")
        logger.info(f"Job resource name: {job.resource_name}")
        logger.info(f"Output directory: {output_dir}")
    else:
        logger.info("Training job submitted (running asynchronously)")
        logger.info(f"Monitor job at: https://console.cloud.google.com/vertex-ai/training/custom-jobs")

    return job
We can see how the training job looks (I disabled wandb for this run as it was causing some bugs that I didn’t want to really debug).
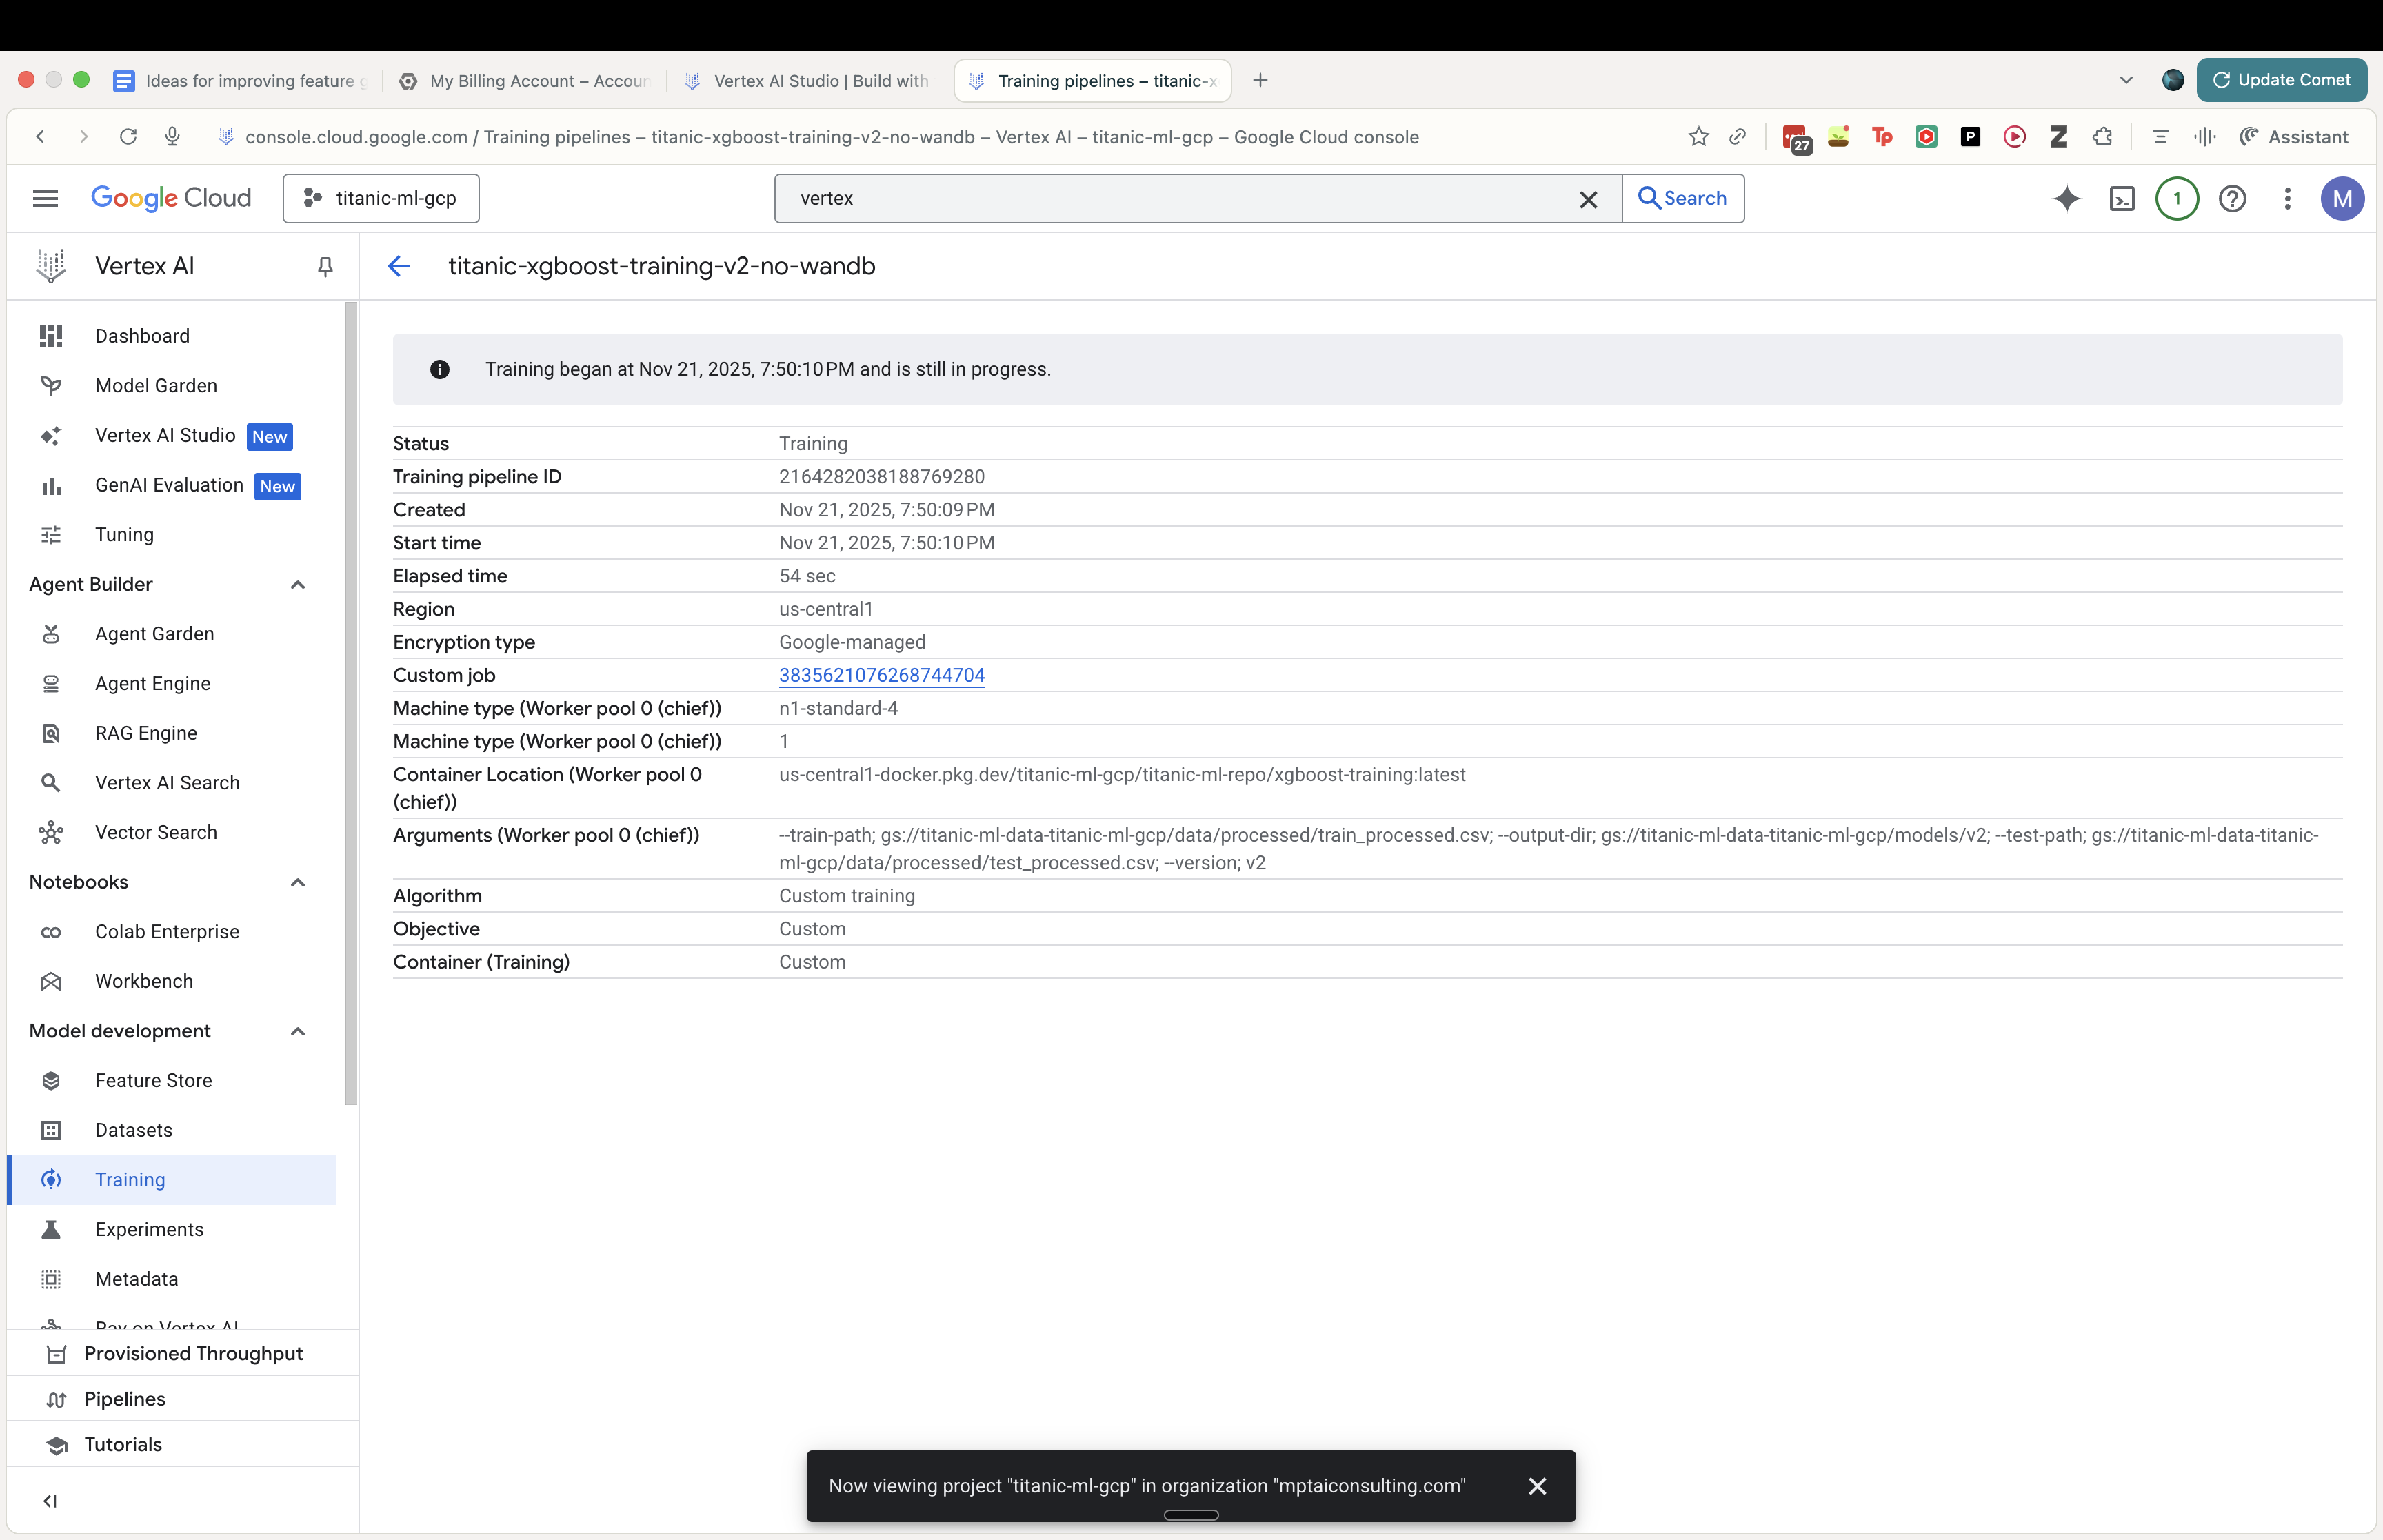
We now have a fully trained model through Vertex AI, one that now also easily deploy as an endpoint.
4. Adding MLOps: MLflow and Optuna
Next, to add some polish, we add MLFlow and Optuna as well.
MLflow is an open-source platform for managing the end-to-end ML lifecycle—tracking experiments, versioning models, and organizing artifacts. In this project it gives us a consistent spine across local Docker runs and Vertex AI jobs: every run captures parameters, metrics (e.g., AUC/accuracy), and outputs (models, preprocessors, plots) so we can compare iterations, reproduce results, and promote specific versions with full lineage. We start with a lightweight local setup (SQLite for the tracking store in ./mlflow/mlflow.db and file-based artifacts in ./mlruns), and can later swap in a managed tracking server and GCS artifact store without changing training code.
Optuna is a fast, flexible hyperparameter optimization framework that uses techniques like TPE and pruning to find better models with fewer trials. For this pipeline, it automates search over XGBoost knobs (depth, learning rate, n_estimators, regularization) targeting higher validation AUC while pruning underperforming trials early to save compute—useful both locally and on Vertex AI. Combined with MLflow logging, each trial’s configuration and metrics are recorded for side‑by‑side comparison and easy rollback to the best-performing settings.
4.1 Adding MLFlow
We’re now adding MLFlow to our model training.
class MLFlowManager:
    def __init__(self, experiment_name: str, tracking_uri: Optional[str] = None, artifact_location: Optional[str] = None):
        """
        Initialize MLflow manager.

        Args:
            experiment_name: Name of the experiment
            tracking_uri: URI for tracking server. Defaults to local sqlite DB in ./mlflow/mlflow.db.
            artifact_location: Location for artifacts. Defaults to ./mlruns.
        """
        self.experiment_name = experiment_name

        # Default to local SQLite DB if not specified
        if not tracking_uri:
            # Ensure mlflow directory exists
            mlflow_dir = Path("mlflow")
            mlflow_dir.mkdir(exist_ok=True)

            # Use absolute path for SQLite to avoid issues
            db_path = mlflow_dir.absolute() / "mlflow.db"
            self.tracking_uri = f"sqlite:///{db_path}"
        else:
            self.tracking_uri = tracking_uri

        logger.info(f"Setting MLflow tracking URI to: {self.tracking_uri}")
        mlflow.set_tracking_uri(self.tracking_uri)

        # Create or get experiment
        try:
            # Check if experiment exists
            experiment = mlflow.get_experiment_by_name(experiment_name)

            if experiment is None:
                logger.info(f"Creating experiment: {experiment_name}")
                self.experiment_id = mlflow.create_experiment(
                    name=experiment_name,
                    artifact_location=artifact_location
                )
            else:
                self.experiment_id = experiment.experiment_id
                logger.info(f"Using existing experiment: {experiment_name} (ID: {self.experiment_id})")

            mlflow.set_experiment(experiment_name=experiment_name)

        except Exception as e:
            logger.error(f"Error setting up MLflow experiment: {e}")
            raise
4.2 Adding Optuna
We also add Optuna as well.
import optuna
import xgboost as xgb
from sklearn.metrics import roc_auc_score
import mlflow
import logging

logger = logging.getLogger(__name__)

def titanic_objective(trial, X_train, y_train, X_val, y_val):
    """
    Optuna objective function for Titanic XGBoost model.

    Args:
        trial: Optuna trial object
        X_train, y_train: Training data
        X_val, y_val: Validation data

    Returns:
        float: AUC score (maximize)
    """

    # Define search space
    params = {
        "objective": "binary:logistic",
        "eval_metric": "auc",
        "verbosity": 0,
        "tree_method": "auto",
        "random_state": 42,
        "n_jobs": -1, # Use all cores

        # Hyperparameters to tune
        "max_depth": trial.suggest_int("max_depth", 3, 10),
        "learning_rate": trial.suggest_float("learning_rate", 0.01, 0.3, log=True),
        "n_estimators": trial.suggest_int("n_estimators", 50, 1000),
        "subsample": trial.suggest_float("subsample", 0.5, 1.0),
        "colsample_bytree": trial.suggest_float("colsample_bytree", 0.5, 1.0),
        "min_child_weight": trial.suggest_int("min_child_weight", 1, 10),
        "gamma": trial.suggest_float("gamma", 0, 1.0),
        "reg_alpha": trial.suggest_float("reg_alpha", 0, 1.0),
        "reg_lambda": trial.suggest_float("reg_lambda", 0, 1.0),
    }

    # Pruning callback
    # Note: validation_0 is the default name for the first eval_set
    pruning_callback = optuna.integration.XGBoostPruningCallback(trial, "validation_0-auc")

    model = xgb.XGBClassifier(**params)

    # Fit model
    model.fit(
        X_train,
        y_train,
        eval_set=[(X_val, y_val)],
        verbose=False,
        callbacks=[pruning_callback]
    )

    # Predict
    preds = model.predict_proba(X_val)[:, 1]
    auc = roc_auc_score(y_val, preds)

    return auc
4.3 Improving our model training process using MLFlow and Optuna
4.3.1 Adding our training artifacts using MLFlow
We add our training artifacts (logs, model binaries, etc.) to MLFlow.
mlflow_manager = MLFlowManager(experiment_name="titanic_retraining_local")

    with mlflow_manager.start_run(run_name="baseline_run", tags={"type": "baseline"}) as run:
        baseline_model, base_auc, base_acc = train_baseline(X_train, y_train, X_val, y_val)

        mlflow.log_metrics({"auc": base_auc, "accuracy": base_acc})
        mlflow.xgboost.log_model(baseline_model, "model")
        mlflow.log_params({"max_depth": "default", "learning_rate": "default"})
We do the same for the run where we train the optimized Optuna model.
    with mlflow_manager.start_run(run_name=f"retrain_{timestamp}", tags={"phase": "2", "type": "retraining"}) as run:

        # Log basic info
        mlflow.log_param("n_trials", n_trials)
        mlflow.log_param("timeout", timeout)
        mlflow.log_param("features_count", len(X.columns))
        mlflow.log_param("features", str(list(X.columns)))

        # Run optimization
        study.optimize(
            lambda trial: titanic_objective(trial, X_train, y_train, X_val, y_val),
            n_trials=n_trials,
            timeout=timeout,
            callbacks=[mlflow_callback]
        )

        best_trial = study.best_trial
        logger.info(f"Optimization complete. Best AUC: {best_trial.value}")
        logger.info(f"Best params: {best_trial.params}")

        # Log best params to parent run explicitly for easy access
        mlflow.log_params(best_trial.params)
        mlflow.log_metric("best_auc", best_trial.value)

        # 6. Train Final Model
        logger.info("Training final model with best parameters...")
        best_params = best_trial.params
        # Add fixed params
        best_params.update({
            "objective": "binary:logistic",
            "eval_metric": "auc",
            "verbosity": 0,
            "tree_method": "auto",
            "random_state": 42
        })

        final_model = xgb.XGBClassifier(**best_params)
        final_model.fit(X_train, y_train)

        # 7. Register Model
        # Log model to the parent run
        mlflow.xgboost.log_model(final_model, "model")

        # Register in local registry
        model_uri = f"runs:/{run.info.run_id}/model"
        reg_name = "titanic_xgboost_local"

        logger.info(f"Registering model to {reg_name}")
        mlflow_manager.register_model(model_uri, reg_name, tags={"features": str(list(X.columns)), "auc": str(best_trial.value)})
We can see that MLFlow makes it significantly easier to organize all the artifacts related to a given model run. The alternative to MLFlow here would be defining all the tooling ourselves to organize these artifacts, whereas if we just run our training within an MLFlow context manager, this is all accounted for automatically.
base) ➜  model git:(titanic_ml_gcp_pt_ii_local) ✗ ls
MLmodel          conda.yaml       model.xgb        python_env.yaml  requirements.txt
(base) ➜  model git:(titanic_ml_gcp_pt_ii_local) ✗ pwd
/Users/mark/Documents/projects/data_ml_engineering_projects/titanic_ml_gcp/mlruns/1/88428a5c06e6405fb94fabe23ddaa911/artifacts/model
Without MLflow, our typical workflow would be:
- Run a Python script with hyperparameters hardcoded or passed as arguments
- Print results to terminal: print(f”AUC: {auc_score}”)
- Maybe save model to a file like
model_v1.pklorxgb_model_20251121.xgb - Keep a manual spreadsheet or text file tracking which parameters gave which results
- Hope we remember the exact command that produced the best model
- Email model files around for collaboration.
What MLflow Provides
1. Automatic Experiment Tracking
MLflow captured 27 runs automatically, including:
- 4 baseline runs (our default XGBoost models)
- 1 parent optimization run (the Optuna session)
- 20 individual trial runs (each Optuna hyperparameter combination)
- 2 failed runs (from our debugging)
Having MLFlow makes it much easier to organize multiple ML training runs.
2. Persistent Parameter & Metric Storage
Every single hyperparameter combination was logged:
| Trial | max_depth | learning_rate | n_estimators | AUC | Notes |
|---|---|---|---|---|---|
| Trial 13 | 8 | 0.282 | 246 | 0.9158 | ✅ BEST |
| Trial 1 | 4 | 0.091 | 85 | 0.9018 | |
| Trial 6 | 8 | 0.026 | 199 | 0.9068 |
3. Model Registry & Versioning
Model Name: titanic_xgboost_local
Version 1: Automatically created and tagged
Metadata: Features used, AUC score, source run ID
File Location: Standardized path in mlruns/1/570ab8e4.../artifacts/model/
4. Reproducible Environment Capture
Each model includes:
- conda.yaml: Exact package versions
- python_env.yaml: Python environment specification
- requirements.txt: Pip dependencies
- MLmodel: Model metadata and loading instructions
4.3.2 File Organization Created by MLflow
mlflow/
├── mlflow.db (266KB)          # SQLite database with all run metadata
└── optuna.db (143KB)          # Optuna study state

mlruns/1/                      # Experiment ID 1
├── 570ab8e4.../               # Our main optimization run
│   └── artifacts/model/
│       ├── model.xgb (192KB)  # The actual trained model
│       ├── MLmodel            # Model metadata
│       ├── conda.yaml         # Environment specification
│       └── requirements.txt   # Dependencies
├── 210566b3.../               # Trial 13 (best individual trial)
├── 37d0ef9b.../               # Trial 1
└── [18 more trial directories]
4.3.3 What did Optuna find for our model training?
We used Optuna to find an optimal hyperparameter configuration for our model training.
We trained a Baseline Model (standard XGBoost defaults) and compared it against an Optuna Optimized Model (after 20 trials).
| Metric | Baseline (Default) | Optuna Optimized | Improvement |
|---|---|---|---|
| AUC-ROC | 0.8835 | 0.9158 | +0.0323 |
| Accuracy | 79.89% | 83.80% | +3.91% |
Optuna converged on this hyperparameter configuration:
{
    "max_depth": 8,
    "learning_rate": 0.282,
    "n_estimators": 246,
    "subsample": 0.828,
    "colsample_bytree": 0.620
}
Optuna found a hyperparameter configuration (specifically a higher learning rate of ~0.28 and depth of 8) that significantly boosted the model’s ability to distinguish between survivors and non-survivors, pushing accuracy from ~80% to nearly 84%.
5. Summary
In this walkthrough, we built a complete production ML pipeline on GCP using the Titanic dataset. Starting from raw data ingestion through Google Cloud Storage and Vertex AI Feature Store, we progressed through containerized model training with XGBoost, both locally and on Vertex AI Custom Training jobs. We also added Weights & Biases to provide real-time experiment tracking and visualization.
I wanted to get some experience with using GCP after having only used AWS, and this project was a good end-to-end example of how to do ML engineering on GCP. This pipeline demonstrates how combining GCP’s managed services with open-source MLOps tools creates a robust, scalable foundation for production machine learning that can easily extend to more complex datasets and models.